
Friday, January 17, 2014
Here's one more update. I've started Martin's other eye. This is going
to be real dark, I'm going to darkening the entire paper and will try
to bring him out of the shadows so to speak. I'm still using a Pentel
P205 mechanical pencil with a 2B lead. I'm also starting to add a 4H
and a 2H lead for the lighter tones on the face. I'm blending with a
medium tortillion and soft tissue paper. I am overlapping my light and
dark tone then blend them together to try to achieve a nice smooth
transition from dark to light. More to come soon!
Monday, January 13, 2014
Martin King Cavataio (Work in Progress)
Here's another update to my portrait of Martin. I have his hand complete, just need to make some minor tweaks here and there; but for the most part, the hand is done. I added tone to his fingers by applying graphite by making tiny overlapping circles (circulism) then blending with a medium tortillion, also using a circular motion to achieve a smooth blend. I then add another layer of graphite and blending some more. I repeat the process until I achieve the darkest value possible by applying a slightly harder hand pressure each time.
I'll be moving onto Martin's face as I focus on the shadows and try to manipulate the light. I will save the background for last since that will be completely black.
More to come soon!!!!

I'll be moving onto Martin's face as I focus on the shadows and try to manipulate the light. I will save the background for last since that will be completely black.
More to come soon!!!!

Sunday, January 12, 2014
Portrait of Martin
Beginnings of a new portrait. This is 11 x 14 graphite on Strathmore
Bristol Smooth paper. So far I'm using only a Pentel P205 mechanical
pencil with a 2B lead. I'm blending using a medium tortillion.
To begin, I print out my reference photo in gray scale. I then create my line drawing which I call the ugly stage of my process. The line drawing is drawn fairly quickly and doesn't really look like much at this point. I also map out where I want the facial features as well as shadow and light. Once I'm content with the line drawing, I can start to bring my subject to life on paper.
To begin, I print out my reference photo in gray scale. I then create my line drawing which I call the ugly stage of my process. The line drawing is drawn fairly quickly and doesn't really look like much at this point. I also map out where I want the facial features as well as shadow and light. Once I'm content with the line drawing, I can start to bring my subject to life on paper.
 |
| WIP 1 |
 |
| WIP 2 |
 |
| WIP 3 |
Saturday, November 30, 2013
Portrait of Allison
Here's my finished portrait of Allison. I've sprayed the drawing with fixative and now can package up and ship the drawing to her new owner (Allison herself)....I hope she likes it


Wednesday, November 27, 2013
Here's a work in progress scan of my newest portrait. This is Allison, she's 11 x 14 graphite on Bristol Smooth paper. I'm using Pentel P205 0.5mm mechanical pencil with a 2B lead only. I'm blending with a medium tortillion and soft tissue paper. For the highlighted strands of hair, I'm using a Papermate Tuff Stuff eraser stick which I've cut at an angle so that I get a nice sharp edge. I then "draw" the individual highlighted strands of hair. More to come soon!!!


Tuesday, June 25, 2013
Buster Complete
Here's my latest portrait, Buster! He's 11 x 14 graphite on Strathmore Bristol Smooth paper.

Friday, June 21, 2013
Event - Spence Farm - Woburn Farmer's Market Sunda June 21st from 10:00 - 2:00 PM
Spence Farm - Woburn Farmer's Market
Date: Sunday June 23, 2013
Time: 10:00 - 2:00 PM
Location:
41 Wyman Street
Woburn, MA. 01801
Come visit the Woburn Guild of Artists' tent where I along with other artists will be drawing and painting. If you're in the area, stop by and say hi.
Date: Sunday June 23, 2013
Time: 10:00 - 2:00 PM
Location:
41 Wyman Street
Woburn, MA. 01801
Come visit the Woburn Guild of Artists' tent where I along with other artists will be drawing and painting. If you're in the area, stop by and say hi.
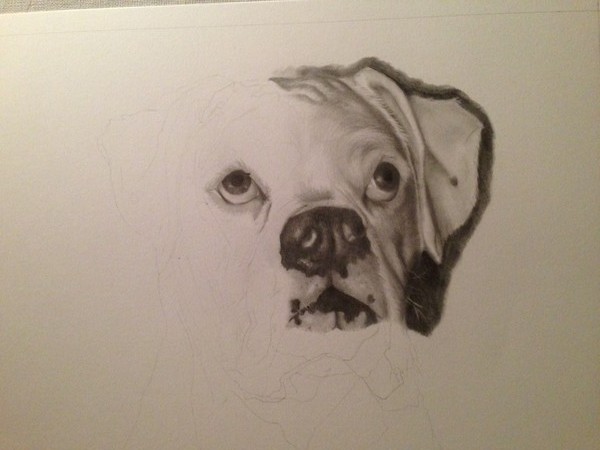
Buster WIP 7
Here's another update of Buster. Sorry for the bad photo, I took the
photo in a dimly lit room. I'll take a better photo on my next update
which should be my final update before Buster is completely finished. I
have his face completed finished and am now starting to work on a bit
of his shoulder and chest area. I'll post another update soon!


Thursday, June 13, 2013
Buster WIP 6
Here's another update on my portrait of Buster. I am working on his
other ear and am starting to add hair to the right side of his face
(screen's left). I'm using strictly a 0.5mm mechanical pencil with a 2B
lead. I'm blending with a medium tortillion and soft bathroom tissue.
I then pick out the lighter hair with a Tuff Stuff Eraser stick which I
cut at an angle to get a nice sharp edge so that I can "draw" a nice
thin line. I hope to have Buster finished this weekend....more to come
soon!


Sunday, May 19, 2013
Buster WIP 5
Here's a small update on my portrait of Buster. I'm working around the
jowel area now. I'm still blending with a medium tortillion and
"drawing" in the lighter fur and whiskers using a Tuff Stuff eraser
stick. More to come soon!


Tuesday, April 23, 2013
Buster WIP 4
Here's an update on my portrait of Buster. I completed his right eye and worked on his chin a bit. Tonight I used a 0.5mm Pentel Mechanical Pencil with a 2B lead. I blended using a medium tortillion with light pressure. I used a Tuff Stuff eraser pen which I cut at an angle so I get a sharp edge which I use to "draw" the highlighted hair. I then go over the entire drawing using a 2 inch hake brush. The bristles of the hake brush is very soft so I'm not worried about smudges but I feel that pulls everything together nicely and gives a nice polished look to the piece; though it may not do anything really but I do love to use it :-)

Subscribe to:
Posts (Atom)
“Pain” WIP 3
Here is an update on my self portrait “Pain” 9 x 12 graphite on Strathmore 300 Bristol Smooth paper I am slowly building up the values and ...

-
 Here is an update on my self portrait “Pain” 9 x 12 graphite on Strathmore 300 Bristol Smooth paper I am slowly building up the values and ...
 -
 Here is an update on my drawing of Kate Zambrano, 9 x 12 graphite pencil on Bristol Smooth paper. Kate is one of the artists who inspires ...